Wednesday, October 26, 2011

Perfect Pumpkin Applesauce Bundt Cake

More fall food, you say?  Why yes!  Readers, as you know, in the fall I'm all about the awesome autumn ingredients!

I'm going to get a little reminiscent here; this cake means a lot to me.  When I was first leaping off the gluten train, I felt lost and overwhelmed.  First I had to mourn the loss of conventional baked goods, then I had to figure out how to make GF baked goods.  This led to much kitchen trauma.  Gluten-free living wasn't as well publicized 5 years ago (forget about those poor people who had to go GF 20+ years ago!  They had to search high and low for info.)  Even in the last 2 years, I have seen leaps and bounds in availability in products and awareness in lifestyle.

So after much confusion regarding mixing flours and figuring out substitutions, I started baked away and failing.  Not just failing- failing wildly!  Unbaked cakes.  Burned on the outside cakes, undone in the middle.  Brick heavy baked goods.  Tasteless.  Odorless.  Odor-full.

Frustrated, I reached out on message boards to experienced GF bakers for help and consolation.  One genius baker suggested a fix to my unbaked cake debacle:  She used bundt pans for cakes because there was no center, so everything baked fully and well.  Looking back, I'm sure there was a scientific fix to this disaster, but I thought that was a brilliant idea!  I bought a bundt pan and tried again.  Success!  Happiness flooded my tired, frustrated GF body, and I nearly cried.  It was the moment I realized I could do this.  I could bake GF, and it would be okay.  Everything would be okay.

This Pumpkin-Applesauce Bundt Cake is the very first cake recipe I made-up (based on a basic regular cake recipe) and it not only baked beautifully, it tasted fantastic.  In fact, it's my highest rated public posted recipe on Food.com.  It was the first time I felt truly proud of making something from scratch.  This cake defines the beginning of my GF journey.

As an added bonus, I recently had the opportunity of sharing this cake recipe on the brilliant site Eating Rules which marked another one of my firsts:  a guest post.

So get ready to bake up and enjoy this moist, delicious superstar.  Feel free to add some festive chocolate glazing for a fantastic Halloween treat!

NOTE: Do NOT try and make this cake in any regular pan. Because of its moisture level, it will only cook normally in a bundt pan.

Pumpkin Applesauce Bundt Cake


Ingredients:
2 cups sugar (I've been using Coconut Sugar these days, but any will do)
2 cups cooked/canned pure pumpkin
1 cup unsweetened natural applesauce
1/2 cup extra virgin olive oil
4 eggs
2 cups any all purpose gluten-free flour mix (I like to use a sorghum mix, yay whole grains!)
1 tsp salt
1 tsp baking soda
2 tsp baking powder (corn-free, Hain Pure Foods is great)
2 tsp cinnamon

Directions:
Preheat oven to 350 degrees F.
In a large bowl, beat eggs until fluffy.
Blend in sugar, pumpkin, applesauce, and oil by hand or with a mixer on low just until combined.  Do NOT overmix!
Add all dry ingredients, one at a time, blending together.
Pour batter into a greased, large bundt pan and bake for 1 hour.
Check with a toothpick/knife to make sure it's cooked through, cool, and enjoy!


Don't forget to freeze left-overs, wrapping in parchment paper before storing.

I hope this cake brings you as much joy as it brought me :)

Tuesday, October 18, 2011

Cranberries & Apples- A Perfect Match

I can never get over the joys of fall produce; I nearly yelped when fresh cranberries lined the display of my local grocery.  There is only one way to celebrate the arrival of cranberries: my Cranberry-Apple Chutney!  Now it's not technically a chutney in the traditional sense, where vegetables are cooked down with spices, but it has the same consistency and would not pass as a sauce or jam.  That's why I call it a chutney- don't hate ;)

There is so much to adore about this sumptuous side:

  • The color is vibrant and immediately jazzes up every plate. 
  • The fragrance is to die for.
  • It's the perfect compliment to meats and veggies that need a little tang.
  • What better way to get loads of fiber and antioxidants?
As always, this chutney is an extremely easy fix.  It takes at most about 30 minutes from start to finish, and the ingredients are affordable.  A little also goes a long way.

The flavor is adjustable depending upon what your tastes are.  I like this quite tart, quite.  My recipe is based on those specific tastes.  Please feel free to use more sugar to your tastes.  The best way to do that is to add sugar, a tablespoon at a time, until you reach a preferred flavor.  Same if you're a spice-a-holic:  feel free to up the spices a teaspoon at a time.  This recipe is mild-medium spiced.  The cranberry has an overpowering flavor, so you may decide you need more spice for them to shine through.

Cranberry-Apple Chutney


Ingredients:
2 small gala apples, peeled and diced or rough chopped
12 oz cranberries, rinsed and dried
6 tbs desired sugar (I prefer Coconut Sugar, always try to use Fair Trade!)
1 tbs Earth Balance Soy-Free or comparable fat (butter, margarine etc...)
1 tsp ground nutmeg
1 1/2 tsp ground ginger
3 tsp cinnamon

Directions:
Melt the Earth Balance (or fat) low heat in a medium saucepan.
Add apple, and stir to coat, sauteing until the apples become slightly tender but not browned.
Add cranberries and all spices stirring to combine.


Raise to medium-high heat, stirring constantly to avoid sticking.
Add sugar 1 tbs at a time, while stirring.
The cranberries will begin to break down due to the heat.  Give the pot a stir, wait about 30 seconds, and then re-stir, repeating so that the cranberries will break down evenly.
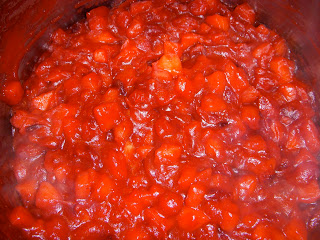
When all the cranberries are broken down and the mixture looks like this:


Taste the mixture.  Too tart?  Add more sugar one tbs at a time.  Not spiced enough?  Add more spices one tsp at a time.  Stir constantly.
When desired flavor is reached, remove mixture from stove and transfer to serving dish.  I like to let the dish cool to room temperature.  Feel free to serve hot or chill for a colder dish.

Ta-da, you're done!  Now didn't I tell you that was easy?

Tuesday, October 11, 2011

Fall's Here! Butternut Squash Fries Anyone?

It's fall again which means it's time for yummy autumn produce to line the aisles of your favorite farmer's markets and grocery stores.  I for one have been getting increasingly excited as the apples, squash, pumpkins and cranberries start rolling in.  How many amazing things can you make with all of these delicious ingredients?  Countless.  But let's start with a personal favorite:  Butternut Squash Fries.

This recipe is ridiculously easy; the only things you need are a super sharp knife and patients.  Although I love these fries, I hate cutting up raw butternut.  Probably because until this year, I didn't have a super sharp knife.  Please make sure when you're cutting up the squash that you protect yourself by making sure the squash is stable against a cutting surface and that your fingers and body are kept away from the knife, because you will be pushing against the produce. 

The end result is more than worth it!  This is a super healthy, vegan-friendly and allergy-free alternative to the potato fry craving.  You'll want to eat them all at once, so the only real problem with these fries is saving some for the next day ;)

Butternut Squash Fries


Ingredients:
1 medium/large Butternut Squash
1 small bunch fresh thyme (leaves detached from stems and chopped up)
1 small bunch fresh rosemary (leaves detached from stems and chopped up)
olive oil
sea salt and black pepper to taste (optional)

Directions:
Preheat oven to 425 degrees F.
Peel the squash.
Cut in half and scoop out seeds/pulp; throw seeds/pulp away.
Cut the butternut into thin fry shapes.  Chunky steak fry shapes will need to cook longer.


Toss the fries in olive oil.
Transfer the fries to a parchment paper lined cookie sheet in one layer (or two sheets if they don't fit on one.)


Sprinkle with salt/pepper to taste.
Bake for about 25 minutes, flip fries over, then return to oven.
Bake for 10 more minutes and then sprinkle thyme and rosemary over the fries and return to oven.
Check in 5-10 more minutes.  When fries are soft (and they should be by then) remove from oven.
Transfer to serving dish and serve immediately.  If you cover them or reheat them in a microwave they will get soggier, just like real potato fries.

These are a delicious side dish for guests of all kinds and a vibrant addition to any plate.  It's also a great way to sneak in nutrients for picky eaters.  I hope you enjoy them as much as I do!